
Ninja Slushi Shake Recipe
Looking for something cool, creamy, and fun to sip on? This Ninja Slushi Shake Recipe is just the thing you need.
I made it right at home using my Ninja Slushi machine, and it came out smooth, sweet, and super tasty. It’s an easy way to enjoy a frozen milkshake-style treat without going anywhere.
You don’t need to be a pro in the kitchen. You just pour in a few simple ingredients, hit a button, and the machine does all the hard work. It chills the shake just right and gives it that thick, slushy texture we all love.
Try this once, and you’ll want to make it again. It’s perfect for a warm afternoon or whenever you’re craving something sweet. And if you’re into fruity drinks too, check out my Ninja Slushi Chocolate Milkshake Recipe next!

Why You Love This Ninja Slushi Shake
This Ninja Slushi Shake is a game-changer, and I know you’ll love it as much as I do! Here’s why:
- Quick and Easy: It takes just minutes to make with the Ninja Slushi machine.
- Creamy Delight: The texture is smooth and thick, like a milkshake from your favorite diner.
- Customizable: You can switch up flavors to make it your own.
- Fun for All: Kids and adults both go crazy for this cool treat.
- No Mess: The Ninja Slushi makes it simple to pour and clean up.
I can’t get enough of how fast and fun this shake is to make. Whether I’m cooling off after a long day or treating friends, it’s always a hit.
Ninja Slushi Shake Ingredients
Here’s what you need to make this yummy shake. Each ingredient plays a big role in making it taste amazing:
- 2 cups whole milk: This gives the shake its creamy, rich base. I use whole milk because it makes the shake smooth and thick. If you want a lighter option, you can use 2% milk, but whole milk is my go-to for that classic milkshake feel.
- 1 cup vanilla ice cream: This adds sweetness and that perfect icy texture. I pick a good-quality vanilla ice cream because it blends well and gives a strong flavor. Make sure it’s softened a bit before adding it to the machine.
- 2 tablespoons sugar: This boosts the sweetness just a touch. I use granulated sugar because it dissolves easily in the mix. You can adjust it if you like your shake less sweet.
- 1 teaspoon vanilla extract: This gives the shake a warm, cozy flavor. I use pure vanilla extract for the best taste, but imitation works fine too if that’s what you have.
- 1/4 cup whipped cream (optional): I love topping my shake with whipped cream for extra fun. It makes it feel like a special treat, and you can add a sprinkle of chocolate shavings or sprinkles on top.
Helpful Swaps
If you don’t have some ingredients or want to mix things up, here are some easy swaps:
- Milk: Swap whole milk for almond, oat, or soy milk if you’re dairy-free or want a different flavor.
- Ice Cream: Try chocolate or strawberry ice cream instead of vanilla for a fun twist.
- Sugar: Use honey or maple syrup if you prefer a natural sweetener. Start with 1 tablespoon and taste as you go.
- Vanilla Extract: If you don’t have it, skip it or add a pinch of cinnamon for a warm flavor.
Kitchen Equipment Needed
To make this Ninja Slushi Shake, you’ll need just a few tools:
- Ninja Slushi Machine: This is the star of the show! It freezes and blends your shake to the perfect texture.
- Measuring Cups and Spoons: These help you get the right amounts of milk, ice cream, and sugar.
- Liquid Measuring Cup with Spout: Makes pouring the mix into the Ninja Slushi super easy.
- Spoon or Whisk: For mixing ingredients before pouring them into the machine.
- Glass or Cup: To serve your shake. I like using a tall glass to make it feel special.
- Straw or Spoon: For sipping or scooping your shake.
How To Make Ninja Slushi Shake
Making this Ninja Slushi Shake is so simple, even if you’ve never used the machine before. I’ll walk you through each step so you can make it like a pro. Let’s get started:
Step 1 | Set Up the Machine
First, make sure your Ninja Slushi is clean and on a flat surface. Slide the condensation catch into the grooves under the evaporator.
Then, put the auger over the evaporator and twist it until it clicks. Slide the vessel over the auger and push the bail handle back to lock it in place. Pop the drip tray in front of the motor base until it clicks.
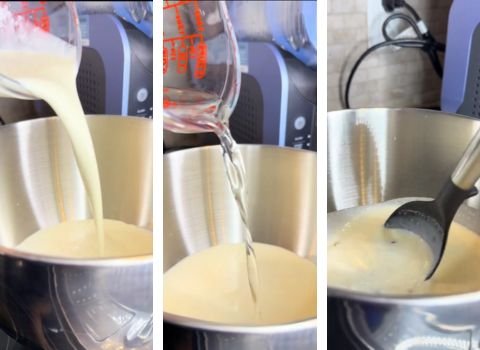
Step 2 | Mix the Ingredients
In a liquid measuring cup with a spout, pour in 2 cups of whole milk. Add 1 cup of softened vanilla ice cream, 2 tablespoons of sugar, and 1 teaspoon of vanilla extract.
Use a spoon or whisk to mix everything until the sugar dissolves and the ice cream blends into the milk. It should look smooth and creamy.
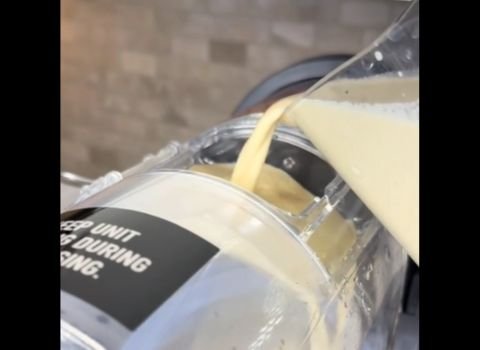
Step 3 | Pour into the Machine
Open the cover on top of the Ninja Slushi. Pour your mix through the easy-fill port. Make sure you have at least 16 ounces of liquid but don’t go over 64 ounces. Close the cover tightly.
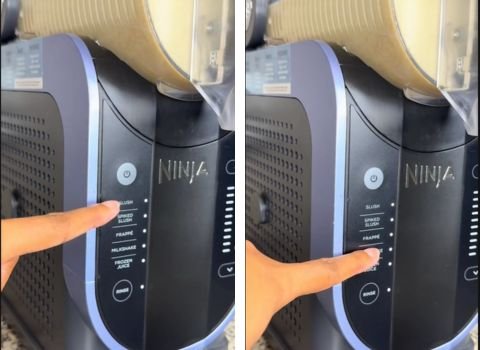
Step 4 | Turn On the Machine
Plug in the Ninja Slushi and press the power button. Choose the “Milkshake” preset by pressing the button.
The machine will start at its default temperature, which is perfect for a creamy shake. If you want it icier, you can press the up arrow to adjust the freeze level later.
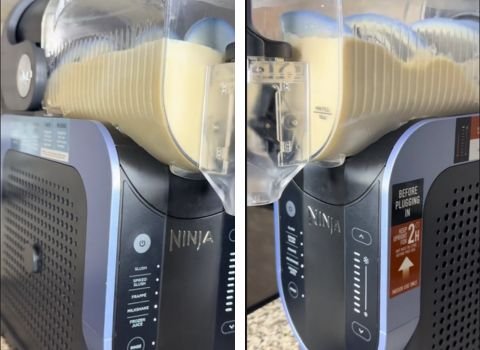
Step 5 | Let It Freeze
The machine will take about 15-30 minutes to turn your mix into a frosty shake. You’ll see the lights pulse while it’s working.
When it beeps and the lights stay solid, your shake is ready! If it’s not thick enough, press the up arrow to increase the freeze level by one or two notches and let it run a bit longer.
Step 6 | Serve It Up
Place a glass under the drip tray. Slowly pull the handle to pour your shake into the glass. If you want, top it with whipped cream and a sprinkle of chocolate shavings or sprinkles. Serve it right away with a straw or spoon.
Recipe Tips for Success
Here are some quick tips to make your Ninja Slushi Shake even better:
- Chill Ingredients: Use cold milk and ice cream straight from the fridge or freezer. It helps the shake freeze faster.
- Don’t Overfill: Stick to the 64-ounce max fill line to avoid spills.
- Taste Test: If you’re not sure about sweetness, taste the mix before pouring it into the machine and add more sugar if needed.
- Clean Right Away: Wash the machine parts after use to keep them in great shape.
- Experiment: Try adding a few crushed cookies or fruit chunks after dispensing for extra texture.
Ninja Slushi Shake Serving Suggestion
This Ninja Slushi Shake is so versatile, you can serve it in tons of fun ways! Here are some ideas:
- Classic Style: Pour it into a tall glass with a straw for a diner vibe.
- Fancy Touch: Top with whipped cream and a cherry for a special treat.
- Kid-Friendly: Serve in small cups with colorful sprinkles for a fun snack.
- Dessert Twist: Add a drizzle of chocolate or caramel sauce for extra sweetness.
- Snack Time: Pair with cookies or pretzels for a sweet-salty combo.
How to Store Ninja Slushi Shake
If you have leftover Ninja Slushi Shake, you can store it to enjoy later. Pour any extra shake into an airtight container and pop it in the fridge.
It’ll stay good for up to 24 hours, but it might lose some of its frosty texture. Give it a quick stir before serving again. For longer storage, you can freeze it!
Pour the shake into a freezer-safe container, leaving a little space at the top for expansion. It’ll keep for up to a week.
When you’re ready to enjoy it, let it thaw in the fridge for a few hours, then stir or blend it to bring back the creamy texture. I love having a batch ready for a quick treat!
Ninja Slushi Shake Recipe FAQs
1. Can I use low-fat milk instead of whole milk?
Yes, you can use low-fat milk like 2% or skim. The shake might be a bit less creamy, but it’ll still taste great. I’ve tried it with 2% milk, and it’s lighter but still yummy.
Just make sure to use enough ice cream to keep the texture smooth. If you want it richer, add an extra scoop of ice cream.
2. Can I make this shake without sugar?
You can skip the sugar if your ice cream is sweet enough, but the Ninja Slushi needs some sugar to freeze properly.
I suggest using at least 1 tablespoon of sugar or a sweetener like honey. Without it, the shake might not get that perfect slushy texture. Test a small batch first to see what works.
3. How do I make the shake thicker?
For a thicker shake, use colder ingredients or increase the freeze level on the Ninja Slushi. I like to press the up arrow once or twice after the machine beeps if I want it extra thick. You can also add more ice cream or less milk to get a richer, denser texture.
4. Can I add fruit to this recipe?
Absolutely! I’ve tossed in a handful of fresh strawberries or bananas after dispensing the shake, and it’s delicious.
Don’t add fruit to the machine, though—it’s not meant for solid ingredients. Blend the fruit separately and stir it in or use it as a topping for extra flavor.
5. Why did my shake come out too liquidy?
If your shake is too runny, it might need more freezing time or sugar. The Ninja Slushi needs at least 8 grams of sugar per 8 ounces of liquid to freeze right.
I’ve had this happen when I used low-sugar milk. Try adding a bit more sugar or ice cream and run the machine longer.
Ninja Slushi Shake Recipe

Creamy Ninja Slushi Shake made in just 25 mins! Blend whole milk, vanilla ice cream & more for the perfect milkshake treat. Easy, rich, and refreshing.
Ingredients
- 2 cups whole milk
- 1 cup vanilla ice cream (softened)
- 2 tablespoons granulated sugar
- 1 teaspoon vanilla extract
- 1/4 cup whipped cream (optional, for topping)
Instructions
Step 1 | Set Up the Machine
First, make sure your Ninja Slushi is clean and on a flat surface. Slide the condensation catch into the grooves under the evaporator. Then, put the auger over the evaporator and twist it until it clicks. Slide the vessel over the auger and push the bail handle back to lock it in place. Pop the drip tray in front of the motor base until it clicks.
Step 2 | Mix the Ingredients
In a liquid measuring cup with a spout, pour in 2 cups of whole milk. Add 1 cup of softened vanilla ice cream, 2 tablespoons of sugar, and 1 teaspoon of vanilla extract. Use a spoon or whisk to mix everything until the sugar dissolves and the ice cream blends into the milk. It should look smooth and creamy.
Step 3 | Pour into the Machine
Open the cover on top of the Ninja Slushi. Pour your mix through the easy-fill port. Make sure you have at least 16 ounces of liquid but don’t go over 64 ounces. Close the cover tightly.
Step 4 | Turn On the Machine
Plug in the Ninja Slushi and press the power button. Choose the “Milkshake” preset by pressing the button. The machine will start at its default temperature, which is perfect for a creamy shake. If you want it icier, you can press the up arrow to adjust the freeze level later.
Step 5 | Let It Freeze
The machine will take about 15-30 minutes to turn your mix into a frosty shake. You’ll see the lights pulse while it’s working. When it beeps and the lights stay solid, your shake is ready! If it’s not thick enough, press the up arrow to increase the freeze level by one or two notches and let it run a bit longer.
Step 6 | Serve It Up
Place a glass under the drip tray. Slowly pull the handle to pour your shake into the glass. If you want, top it with whipped cream and a sprinkle of chocolate shavings or sprinkles. Serve it right away with a straw or spoon.
Nutrition Information:
Serving Size: 1Amount Per Serving: Calories: 310Total Fat: 16gSaturated Fat: 10gCholesterol: 55mgSodium: 120mgCarbohydrates: 36gSugar: 34gProtein: 7g
Did you make this Ninja Slushi Shake Recipe? Please leave a ⭐ rating and review!